I often find myself drawn to the way a small, unexpected underlayer can transform the finished surface of a painting. Lately I’ve been experimenting with using gouache as an underlay beneath vibrant acrylic highlights — a pairing that feels slightly rebellious because gouache and acrylic sit so differently on the material spectrum. In this piece I’ll take you through why I use gouache underlays, how I prepare surfaces, step-by-step layering methods, colour interactions to watch for, and troubleshooting tips from my own studio mishaps.
Why use gouache under an acrylic highlight?
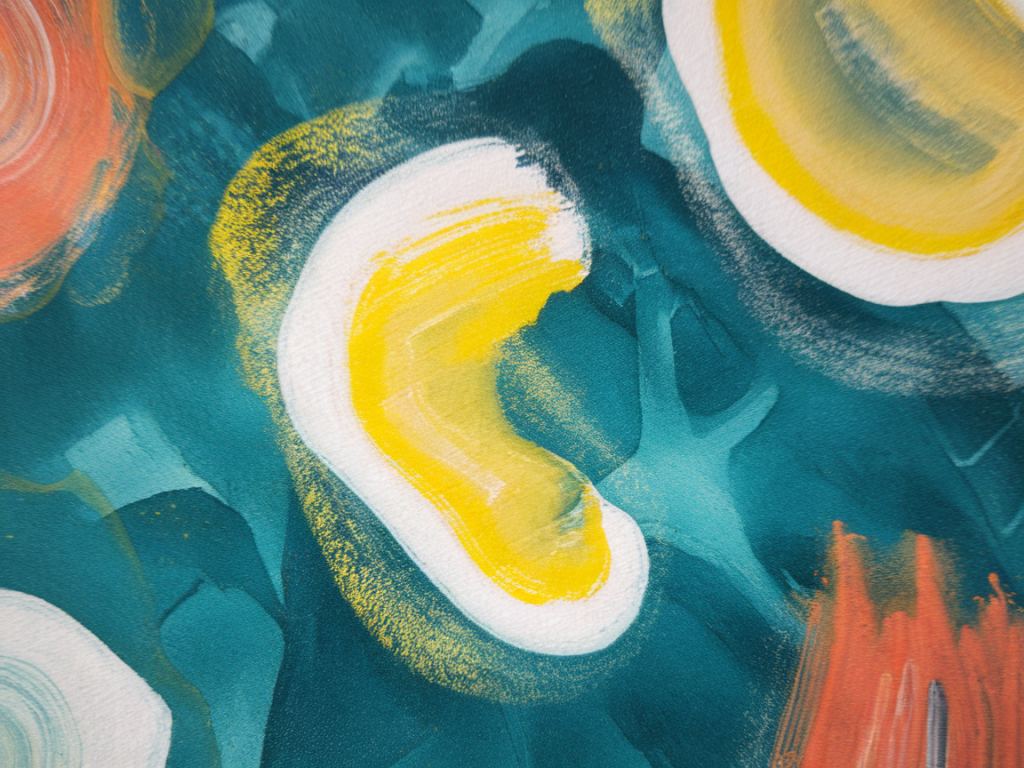
Gouache has a velvety, opaque matt finish that absorbs light in a particular way; it can create saturated, flat planes that sit beneath glossy or semi-glossy acrylic highlights. By laying down areas of gouache first I can:
Establish bold, even tones without the shine or plasticity of acrylic.Create subtle textural contrasts where the acrylic sits on top of a matte base.Use gouache to build visual depth — the acrylic can reflect light differently depending on the underlayer.Work faster when blocking-in colours; gouache reworks easily when damp, letting me refine before committing with acrylic.For me, the tension between the soft, almost chalk-like quality of gouache and the synthetic sheen of acrylic is exactly the kind of visual friction that keeps paintings lively.
Materials I reach for
My kit is intentionally simple so you can replicate the experiment without bespoke supplies. Typical materials include:
Gouache: Winsor & Newton Designers’ Gouache or Schmincke Horadam for vibrant, consistent pigments.Acrylics: Heavy body or fluid acrylics from Golden or Liquitex — I select according to the thickness I want in the highlight.Surface: Paper (300gsm hot-pressed watercolour paper), heavyweight Bristol, or primed wood panel. Avoid raw canvas for heavy gouache usage; it soaks unevenly.Mediums: Acrylic gloss medium to increase sheen of highlights if needed, and a matte medium if you want to reduce acrylic shine.Brushes: Synthetic flats for acrylic, soft synthetic or natural-hair rounds for gouache.Masking: Low-tack tape or frisket for crisp edges.Step-by-step layering experiment
I’ll outline a basic process I use for a small panel. Think of these steps as a template — adapt proportions and drying times to suit your studio conditions.
1. Prepare the support: Size and prime if you’re using wood. On paper, tape the edges to a board to prevent warping.2. Plan your composition: Make a quick pencil sketch or a tonal thumbnail. Decide where gouache will form the base and where acrylic highlights will sit.3. Apply the gouache underlay: Block in large areas with gouache, working quickly. I aim for slightly richer colour than I think I need because acrylic applied on top can appear more translucent than expected. Allow the gouache to dry completely — typically 30–60 minutes depending on thickness and humidity.4. Add texture if desired: While the gouache is tacky, I sometimes lift bits with a tissue or scrape gently with a palette knife to reveal paper texture. Because gouache reactivates with water, these manipulations are forgiving.5. Seal or test adhesion (optional): If the surface will be heavily reworked with acrylic, I sometimes mist a very light coat of acrylic matte medium to prevent gouache from reactivating when acrylic layers touch it. Test this in a small area first — too much medium will alter the colour and texture.6. Apply acrylic highlights: Use heavier-bodied acrylic where you want the glossy, distinct marks to sit on top. For a glossy pop, mix in a small amount of gloss medium. For subtler highlights, thin acrylic slightly with water or a glazing medium.7. Layer and refine: Build highlights gradually. Acrylic dries quickly so you can add additional layers without disturbing the underlying gouache if you sealed it; if not, be cautious with wet-on-wet acrylic over gouache.Colour interactions and optical effects
One of the most exciting outcomes is how colour reads differently depending on the underlayer:
Warm gouache under cool acrylic can create a vibrant, almost neon edge when the top layer is semi-transparent.Deep, matt gouache will mute the reflected light of acrylic, making glossy highlights pop by contrast.Layering a slightly different hue of acrylic over gouache can produce optical mixing that feels more luminous than a flat colour painted in one go.When choosing colours, I often paint a small test swatch to see actual wet and dried effects. Digital previews are helpful but never replace a physical test patch.
Common problems and how I fix them
Here are issues I’ve encountered and the methods I use to resolve them:
Gouache reactivates when acrylic is applied wet: Either wait for the gouache to cure fully (overnight) or apply a thin, dry coat of matte acrylic medium to seal the area. Avoid heavy water in your acrylic mix if working directly on gouache.Cracking or flaking: This happens when gouache is applied too thickly on a rigid support. Use thinner layers and allow complete drying between passes.Colours looking dull after acrylic: Add a high-gloss detail or small strokes of unmodified pigment to bring back the vibrancy. A spot varnish can also reinstate depth selectively.Uneven sheen: Balance gloss and matt by using gloss medium only in isolated highlights or apply an overall satin varnish when the piece is finished to unify the surface.Samples and variations I recommend trying
Once you’re comfortable, play with these variations:
Use fluorescent gouache under translucent acrylic glazes to create optical vibrancy.Try metallic acrylic highlights over matte gouache for an iridescent effect.Combine textured gouache techniques (sponging, dry brushing) with high-gloss acrylic details for contrast.Practical studio notes
Humidity and temperature matter — gouache takes longer to fully cure in damp conditions, which increases the risk of reactivation. I keep small sheets clipped to a board and prefer to work in the morning when the studio is cool and dry. Label your layers as you go in a sketchbook; I often note pigments and ratios so I can reproduce a particularly successful pairing later.
There’s no single “right” way to pair gouache and acrylic — the fun is in experimentation. Use these steps as a starting point, then break the rules. Some of my favourite pieces began as stubborn mistakes that turned into deliberate marks.