I spend a lot of time photographing test swatches, small paintings and pigment studies that contain metallic and iridescent particles. If you’ve tried this before you’ll know the problem: a beautiful shimmer in real life turns into a blown-out white hotspot in the photo, or the colour shift disappears entirely. Over the years I’ve developed a few reliable approaches using nothing more than household lights, inexpensive modifiers and small-camera tricks. Here’s exactly how I do it — practical, step-by-step, and written from the studio floor.
Why metallics and iridescence behave differently
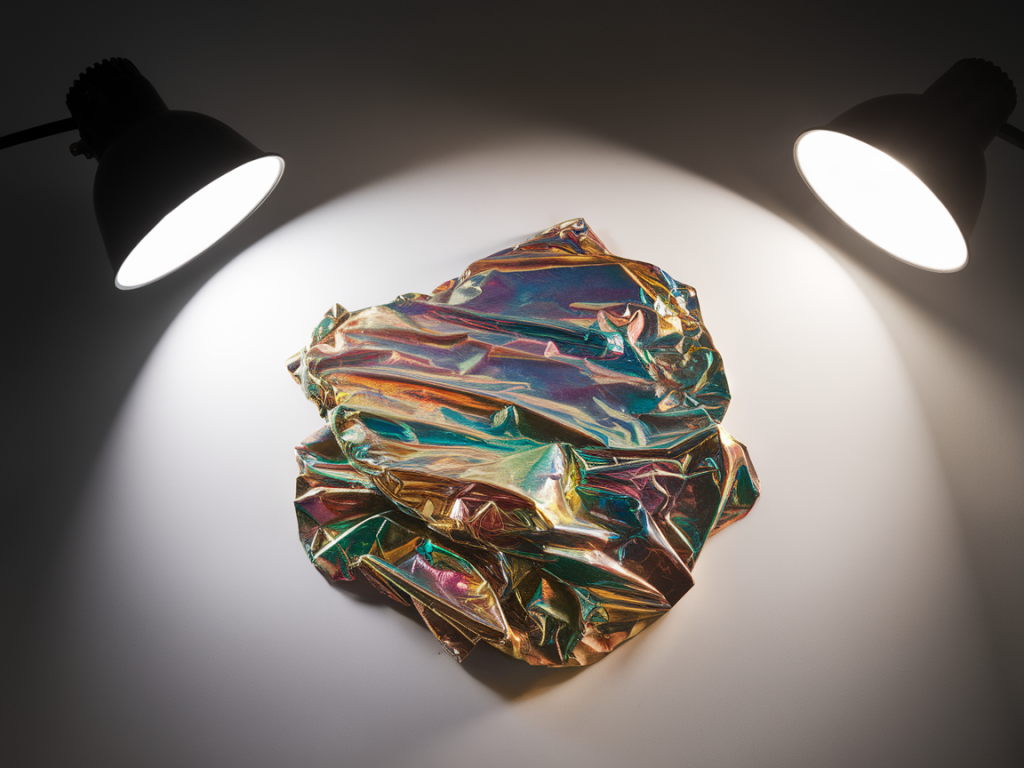
Metals and iridescent pigments create two related but distinct challenges. Metallic flakes are specular reflectors: they reflect light like tiny mirrors, which creates concentrated highlights (hotspots) when the light source is bright and directly reflected into the lens. Iridescent pigments produce angle-dependent colour shifts — they can look one colour from one view and entirely different from another. A single direct household bulb will either wash these effects out or create glare that hides the material's texture and nuance.
My basic setup (using household lights)
You don’t need studio strobes to get useful results. My go-to kit consists of:
a desk lamp or LED panel (variable brightness is useful)a second lamp for fill or rim lightdiffusers made from baking parchment, a white shower curtain, or a white bedsheetblack card or foamboard to cut reflectionsa tripod or stable surface for the camera or phonepolarizing filter (if you have one) or a polarizing film sheetAll of these are household items or inexpensive purchases. The key is control: controlling the direction, quality and intensity of light rather than its colour temperature alone.
Step-by-step: prevent hotspots with soft, controlled light
When I photograph a swatch I follow these practical steps. You can adapt them to small paintings, loose pigment samples or packaging shots.
Position the artwork horizontally or at the angle you want to show. For flat swatches I often shoot from slightly above (10–20°) to keep the angle consistent.Replace direct bulb-to-surface light with a large, soft source. Tape baking parchment or tracing paper over the lamp to create a diffuser. This enlarges the apparent light source, reducing the intensity of specular highlights and softening hotspots into attractive, even shimmer.Use oblique lighting. Move the diffused lamp so it hits the surface from one side at a low angle (grazing light). This emphasises texture and flake orientation without producing a mirror-like reflection back into the lens.Introduce a second light as a gentle fill from the opposite side if shadows are too deep, again diffused. Keep this fill weaker than your main light.Use black cards to spool out unwanted reflections. Place small strips of matt-black card between the camera and the light source to block direct reflections—this doesn’t change the overall illumination but prevents bright bulbs from catching in the pigment.Adjust your camera or phone angle. Often a tiny change in camera height or lateral position eliminates a hotspot because it changes the reflective path. Move around slowly while watching the live view and stop when the sheen looks closest to what you see in the studio.Camera settings and capture workflow
Whether you’re using a phone or DSLR, these capture principles help preserve colour and avoid clipped highlights.
Shoot RAW if possible. RAW retains highlight and colour information that JPEG often throws away — vital for iridescent pigments where subtle shifts matter.Expose for highlights. I slightly underexpose (–0.3 to –0.7 EV) to protect bright specular areas from clipping. You can bring shadows up in post.Use a smallish aperture for depth of field (f/5.6–f/11 on a small-sensor camera) unless you specifically want bokeh.Use a tripod and remote shutter if available to avoid camera shake and to let you inspect the live view without moving the camera.If you have one, fit a circular polarizer to the lens. Rotate it while observing live view: it can tone down reflections without flattening the iridescent change completely. Be careful — too much polarization can remove the sheen entirely.Lighting angles: how I choose them
Angle is the secret sauce. Metallic reflections follow the law of reflection (angle in = angle out). Iridescent pigments change colour depending on both incident and viewing angles.
For evenly distributed shimmer: aim for a wide, diffused light slightly off-axis and photograph around 10–30° from perpendicular.For more dramatic colour shift: use a lower grazing light and experiment by moving your camera around the piece while keeping the lights static. The colour will reveal itself at certain viewing angles.To reduce hotspots from single-direction flakes: use multiple diffused lights from different sides at lower intensities. The many weaker highlights become a pleasing glint rather than a single blowout.DIY light modifiers that work
You can build quick modifiers from household items:
Diffuser: baking parchment, tracing paper or a white shower curtain taped over a lamp.Softbox: make a small softbox by stretching a white pillowcase or clean bedsheet over a lightweight cardboard frame.Flag/black card: cut foamboard into strips to block reflected bulbs from the camera’s line of sight.Polarizer alternative: polarizing film (used for LCD screens or sunglasses) taped to a frame and rotated manually between lens and light will give similar effects to a screw-in polarizer.Post-processing tips
I do a little tidy-up in Lightroom or Photoshop — mostly preserving what I captured rather than heavily altering it.
Open RAW; check the histogram for clipped highlights. If there’s clipping, try a second exposure lower by 1–2 stops and blend in as needed.Use local highlights/shadows adjustments to bring back texture without boosting overall exposure.Fine-tune white balance: metallics can pick up the colour cast of household bulbs. I often set white balance manually to match a neutral target or use the colour picker on a grey card shot in the same setup.If colour-shift accuracy is critical, photograph a small circular swatch or card with a piece of the pigment and use that as a reference for selective HSL adjustments.Common problems and quick fixes
| Problem | Quick fix |
| Blown-out hotspot | Diffuse the light more; slightly underexpose; move camera angle |
| Complete loss of iridescence | Reduce polarization, increase grazing angle, add a second lower-intensity light |
| Colour cast from bulbs | Shoot RAW and correct white balance using a grey card or colour picker |
| Too-flat shimmer | Use a narrower, low-angle light to enhance orientation-based reflectance |
Photographing metallic and iridescent pigments is part technical, part choreography: moving lights, adjusting angles and looking closely at how tiny changes alter the perceived material. Take your time, make incremental changes, and keep a consistent record of what works for each pigment or medium. With the household-light strategies above you’ll find you can capture the layered sparkle and subtle colour shifts that make these materials so exciting in real life.