materials checklist and process for durable mixed-media mural work on board

materials checklist and process for durable mixed-media mural work on board

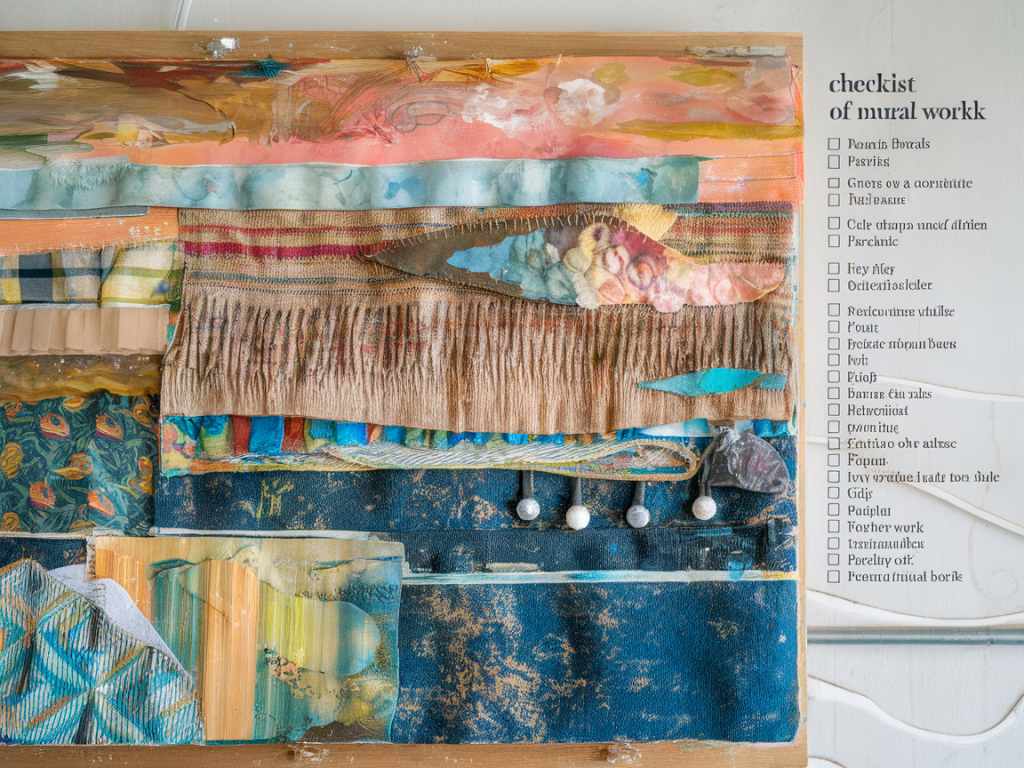
I make a lot of work on board — panels feel reassuringly stable, portable and durable, and they respond beautifully to layers of paint, collage and surface manipulation. When I translate that studio approach into large-scale mixed-media mural work on board, the challenge becomes one of making each element robust: adhesive layers that don’t delaminate, paint that resists cracking, and finishes that protect against dirt and humidity. Below I share my go-to materials checklist and a step-by-step process I use when planning and executing durable mixed-media murals on board. These are practical, tested approaches developed over years of studio play and workshop teaching, so I hope they give you confidence as you build layered surfaces.

Why choose board for mixed-media murals?

Boards — birch plywood, MDF, HDF or specialized panels like hardboard or Baltic birch — offer a rigid support that reduces the risk of movement-related failures (cracking, flaking) common on canvas. For murals that combine collage, heavy-bodied paint, textures and adhesives, that rigidity is a huge advantage. Boards are also easier to sand, seal and edge-treat, which helps when you want neat, resilient finishes or when the work will be installed in a high-traffic environment.

Materials checklist

Below is the condensed list I keep pinned in my studio. Use it as a starting point and adapt to your scale, budget and the environmental conditions where the mural will live.

Category Items / Examples Notes
Boards Baltic birch, exterior-grade plywood, MDF, hardboard (Masonite) Choose exterior-grade for damp locations; 9-18mm depending on size
Priming Acrylic gesso, sandable primer, PVA size Seal raw wood first with thin PVA, then gesso layers
Adhesives PVA glue (e.g. Elmer’s, Gorilla PVA), acrylic medium (Golden or Liquitex), PVA wood glue Use archival PVA and acrylic mediums for longevity
Paints Acrylics (Golden, Liquitex), gouache for flat matt passages, high-build acrylics Acrylics are flexible and stable; oil requires extended curing & isolation
Inks & Pens India ink (waterproof), Posca, Uni-ball, archival pigment pens Test for solubility over layers; use fixative where needed
Collage materials Archival papers, handmade papers, fabric, magazine fragments, leafing Deacidify acidic paper; avoid fragile newsprint unless consolidated
Textural additives Modeling paste, gesso, pumice gel, microballoons Choose acrylic-based texture mediums
Hardware Rivets, screws, battens, hanging brackets Reinforce large panels with battens to prevent warping
Finishes Acrylic varnish (matte/gloss), UV-stable varnish (Golden MSA), spray fixative Use UV-protective varnish for longevity; satin often looks most versatile
Tools Sandpaper (80–400), rollers, brushes, brayer, palette knives, heat gun Heat gun helpful for speeding drying; use cautiously on paper layers

Prepping the board — the foundation of durability

I don’t skip the prep. A well-prepped board is the difference between a mural that lasts and one that slowly sheds layers.

  • Cut and seal edges: If the board will be exposed to fluctuating humidity, seal all edges with a thin coat of PVA or gesso. I often use exterior-grade PVA for added protection.
  • Smooth and fill: Sand rough faces with 120–180 grit and fill knots or gaps with wood filler or acrylic spackle. Re-sand after drying.
  • Size the panel: Apply a thin coat of PVA (1:4 dilution with water) as a sizing layer. This reduces excessive absorbency and prevents adhesives or paints from sinking into the wood grain.
  • Prime: Once the size layer is dry, apply two thin coats of acrylic gesso, sanding lightly between coats with 220–320 grit for a smooth, keyable surface.
  • Building layers — adhesives, collage and paint

    I work in translucent layers so each stage informs the next. The order and compatibility of materials matter — incompatible products are where problems begin.

  • Collage first when possible: For heavier paper or fabric elements, adhere them early with an acrylic medium or PVA, using a brayer to remove air pockets. Golden’s Gel Medium (matte or gloss) is a reliable workhorse.
  • Consolidate delicate papers: For very thin papers or transfers, I often use a dilute PVA to impregnate and strengthen the paper before adhesion. This reduces cockling and makes sanding possible later.
  • Seal collage elements: Once dry, apply a thin coat of acrylic medium over collaged areas to isolate them from subsequent wet layers. This prevents acidic migration and uneven absorption.
  • Paint in layers: Build colour with acrylics, allowing each layer to dry fully. Use thicker modeling paste only where necessary — its added bulk can create stress points if overused.
  • Use waterproof inks for final marks: If you plan to add ink or graphite, check solubility. Many India inks are waterproof once dry; test on a sample first. I use Sakura Pigma for fine archival lines and Posca for opaque highlights.
  • Structural reinforcement and large-format concerns

    When a mural is large, the panel’s caliper and support become paramount.

  • Choose thicker boards or battens: For anything over 1m x 1m I add a lightweight timber frame (battens) screwed to the back. This prevents bowing and makes hanging safer.
  • Allow for expansion: Don’t seal the back completely in humid areas. A thin breathable layer is better than trapping moisture.
  • Secure heavy elements mechanically: If you’re adding metal, ceramic or 3D attachments, fix them with screws or rivets rather than relying on adhesive alone.
  • Finishing and protection

    Finishing is often overlooked, but the right varnish will make your mural resilient to dust, UV and handling.

  • Test varnishes: Try a small area first. Golden MSA varnish is my preference for UV protection and stability; it’s removable with mineral spirits if conservation treatment is needed later.
  • Spray vs brush: For textured surfaces I use spray varnish (e.g., Krylon UV-resistant) to avoid brush marks. For very matte surfaces, a low-sheen acrylic varnish applied with a soft brush gives a natural feel.
  • Final fixatives for drawings: If you have charcoal or pastel elements, use a workable fixative between layers and a stronger conservation fixative at the end.
  • Common pitfalls and quick troubleshooting

    Here are problems I’ve hit and how I usually fix them:

  • Delamination: Often caused by adhesive incompatibility or poor priming. Remove loose areas, sand, clean and re-adhere with an acrylic medium. Reinforce the edges with tape and re-seal.
  • Cracking paint: Usually due to thick layers over flexible underlayers. Sand the area, add a flexible acrylic ground and repaint in thinner layers.
  • Cockling paper: Dry paper under weight after adhesive application, use a heat gun briefly to speed evaporation, or remove and reapply with a consolidation layer first.
  • Working on board for durable mixed-media murals is a balance between creative experimentation and thoughtful material choices. With the right prep, compatible adhesives and protective finishes, you can build rich, layered surfaces that survive handling and the test of time. Keep a small test panel whenever you try a new material combination — that single habit has saved me many headaches and helped me push boundaries with more confidence.


    You should also check the following news:

    Techniques

    five quick compositional studies to improve confidence when starting large canvases

    02/12/2025

    When I stand in front of a primed large canvas for the first time, there’s a small, familiar flinch — part excitement, part dread. Large formats...

    Read more...
    five quick compositional studies to improve confidence when starting large canvases
    Techniques

    how to approach curator-led open calls: sample proposals and images that get noticed

    02/12/2025

    Curator-led open calls can feel intimidating — a tight brief, a jury of professionals, and the sense that you're competing against a large pool of...

    Read more...
    how to approach curator-led open calls: sample proposals and images that get noticed