I often get asked how I photograph iridescent and interference paints on canvas with nothing more than my phone and a single household lamp. These paints are playful and fickle: they change colour with viewing angle, light source and even the slightest move of your hand. Over the years I’ve developed a simple workflow that captures those shifting colours reliably without a studio full of equipment. Below I’ll share my step-by-step approach, practical tips and the little experiments I use to get consistent results at home.
Why photographing iridescent paints is tricky
Iridescent and interference paints don’t behave like opaque pigments. They rely on thin-film interference or mica-based flakes to reflect specific wavelengths of light depending on angle. That means the image you capture is a combination of your phone’s sensor, the angle of light, the angle of viewing and even the lamp colour temperature. If you try to photograph them head-on under diffuse daylight you’ll often lose the “shift” entirely and get a flat result. Understanding this helps you control the variables.
What I use (the minimalist kit)
- My smartphone — I use an iPhone but Android phones work just as well.
- A single household lamp — an LED floor lamp or desk lamp with an adjustable head.
- White or black foamboard as background and reflectors.
- A small clamp or spring clip to secure the canvas if needed.
- A stack of books or a tripod alternative (I use a stack of hardcover books and a rubber band to steady the phone).
- Optional: polarising filter attachment for phone (if you have one, it helps control glare).
Prep your canvas and space
I start by positioning the canvas upright against a neutral wall or leaning on an easel. Keep the surrounding surface uncluttered so that stray reflections don’t introduce unexpected colours. If the paint has a varnish or glossy medium over it, I remove reflections by changing angle rather than adding matte sprays; the reflections themselves carry the iridescence.
Choose a backdrop that complements the work: pure white for clarity, light grey if the piece has delicate tones, or black to emphasise glowing highlights. I often use white foamboard to bounce light back gently and black foamboard to absorb unwanted reflections — both are inexpensive and effective.
Lamp choice and colour temperature
Not all lamps are equal. Incandescent bulbs give warm yellow light, cool white LEDs can be bluish, and some LED lamps are labelled “daylight” (around 5000–6500K). I like to keep the lamp consistent: if possible use the same bulb for a whole shoot. For many interference paints a neutral daylight-balanced LED (around 5000K–5600K) gives natural shifts — but sometimes the warmer or cooler lamp creates more dramatic differences, so I experiment.
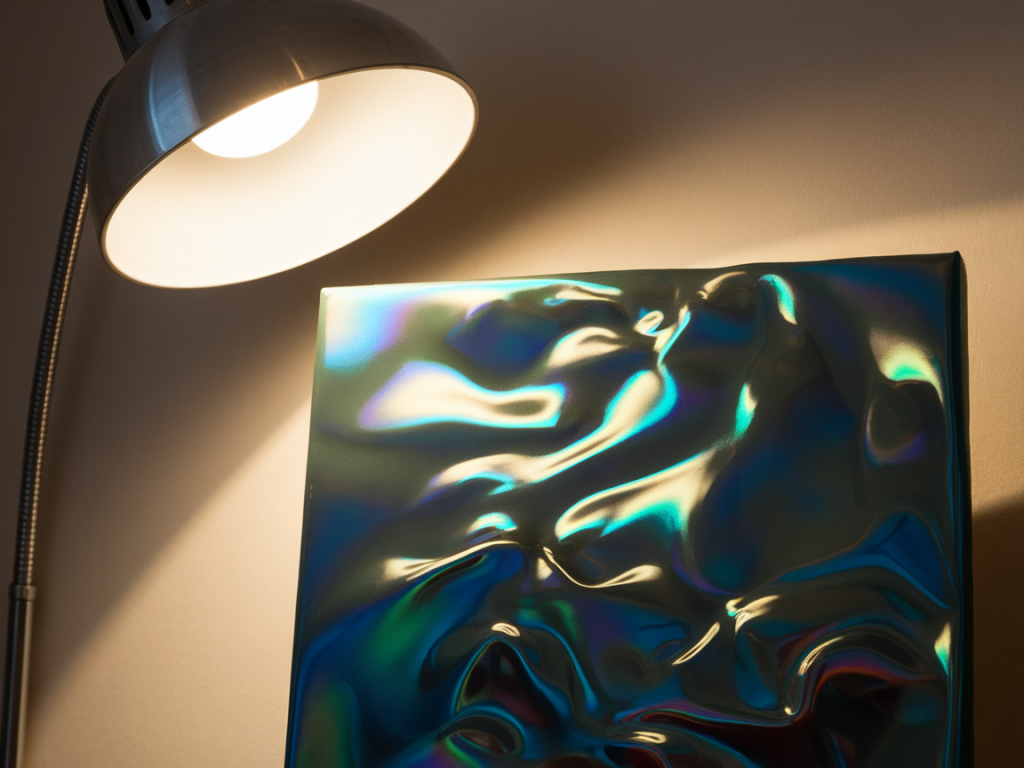
Positioning the lamp — the single-light trick
The simplest and most powerful move is to treat the lamp like a sun you can move. I position the lamp to the side and slightly above the canvas rather than directly in front. This creates grazing light across the surface which reveals the layered flakes or interference layers. Angle matters:
- Low grazing angle: place the lamp almost parallel to the canvas to emphasise texture and make iridescent flakes catch the light.
- Steeper side angle: tilt the lamp so it’s aimed at the centre from 30–45 degrees; this can amplify colour shifts.
- Distance: move the lamp closer for stronger highlights, farther away for broader, gentler shimmer.
Phone positioning and movement
With the lamp in place, I don’t hold the phone dead-centre. Instead I move around slowly and take multiple frames from different angles — for iridescent paints the small changes are everything. I mount my phone on a stable stack of books so I can keep the framing consistent and then tilt the camera up or down in 5–10 degree increments. This gives me a set of images showing the shift.
If you don’t have a tripod, rest your elbows on a table or use a beanbag for steadiness. Use the phone’s self-timer or a Bluetooth shutter to reduce movement.
Phone camera settings and useful modes
- Turn off flash. The lamp is your only light.
- Lock exposure and focus: tap and hold on the canvas area to lock AE/AF on iPhone (or equivalent on Android). This prevents the camera from re-exposing as you move.
- Use RAW mode if available. Phones with Pro or RAW capture (e.g. Halide, Adobe Lightroom mobile) let you retain more colour and recover highlights in editing.
- Exposure compensation: if the iridescent highlights blow out, dial exposure down slightly (-0.3 to -1.0 EV) to preserve colour detail.
- Disable HDR: HDR blends multiple exposures and can flatten the subtle angle-dependent effects.
Polarisation and glare control
Specular glare can hide iridescent colours. A circular polariser for phone (small clip-on filters exist) reduces glare from glossy areas and can help reveal deeper colours. Rotate the polariser while looking at the screen to find the best balance — sometimes a little glare is okay because it carries vivid flashes.
Simple lighting setups I use (table)
| Goal | Lamp placement | Phone position | Result |
|---|---|---|---|
| Maximise shimmer | Low grazing angle, close | Low and slightly off-centre | Strong highlights, visible colour shifts |
| Balanced colour & detail | Side at 30–45°, moderate distance | Head-on with small tilts | Even shimmer and texture |
| Dark mood, dramatic highlights | Side or top, distant, use black background | Off-centre, slight upward tilt | High contrast, glowing iridescence |
Taking the shots — a short checklist
- Turn off overhead lights to avoid mixed temperatures.
- Lock exposure and focus on the area with the most iridescence.
- Take a series of shots while moving around — tiny changes reveal different colours.
- Bracket exposures (one neutral, one -0.5 EV, one -1 EV) to keep highlights from blowing out.
- If using RAW, capture both RAW + JPEG so you have quick reference images and more flexible files for editing.
Editing tips
I usually do minimal edits: straighten, crop, adjust exposure and fine-tune white balance. If you shot RAW you can recover highlight detail and push vibrance selectively. Be careful with global saturation — it can make interference paints look fake. Instead:
- Increase clarity or structure slightly to define mica flakes.
- Use selective dodge/burn to bring out bright flashes.
- Adjust white balance to match the lamp’s colour or to make the iridescence pop (a small tweak can shift the whole range).
Common problems and fixes
Colours look flat: move the lamp to a more grazing angle or change your viewpoint. Iridescence appears in movement.
Highlights blown out: lower exposure, move lamp back, or bracket and merge images.
Weird colour casts: check for mixed light sources — turn off overhead lights and stick to one lamp.
Too much glare: try a polariser or add a small black flag (a piece of card) to block the direct reflection.
Photographing iridescent and interference paints with a phone and a single household lamp is really about learning to dance with light. With practice you’ll discover the particular angles and lamp positions that make each paint sing. I treat every shoot as a little experiment: I change one variable at a time, take a quick series of frames, and then choose the ones that best express the work’s shifting character. If you try this, I’d love to see your results — the small triumphs (and occasional surprises) are half the fun.