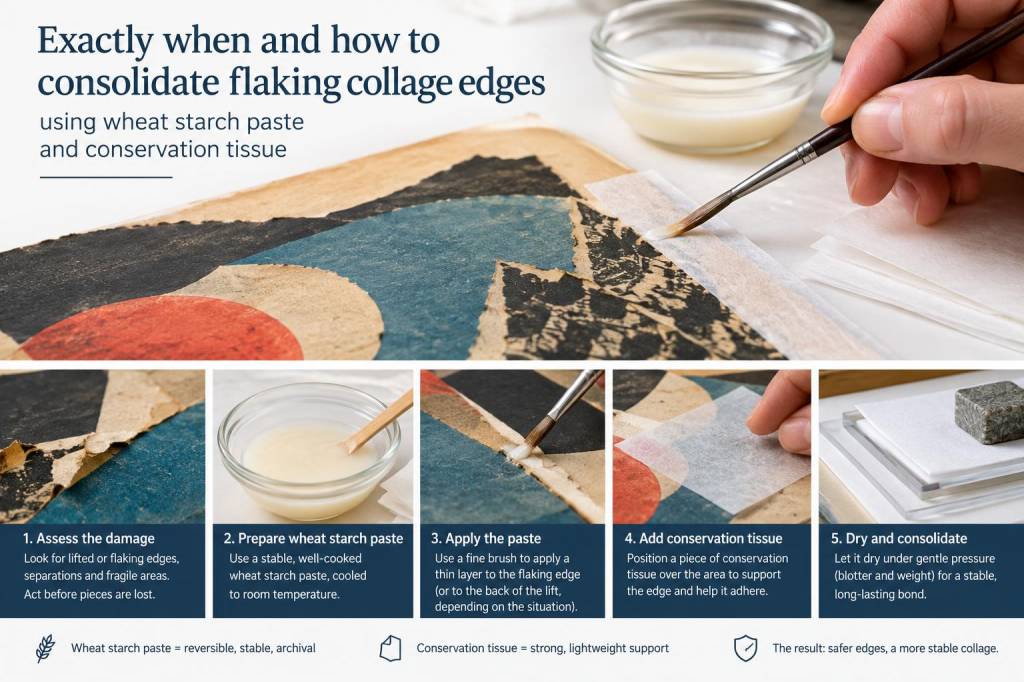
I often encounter collage works with delicate, lifting edges — those tiny curls of paper that threaten to catch, tear or attract dirt. Leaving them alone risks further loss; rushing in with too much adhesive or the wrong technique can change the look and flexibility of the piece. Over the years I’ve developed a conservative, reversible approach that uses wheat starch paste and thin conservation tissue. Below I share exactly when I choose to consolidate, how I prepare the materials, and step-by-step methods that preserve the original surface while stabilising the flaking edges.
When to consolidate flaking collage edges
Consolidation is not always necessary. I consider it when one or more of the following apply:
The lifted edge is unstable and will catch during handling, framing or transport.There is active flaking — small fragments are already separating and falling away.The collage is displayed or handled regularly and the risk of further loss outweighs leaving it as-is.Environmental changes (humidity cycles) are causing repeated lifting.If a lifted edge is purely aesthetic and firmly attached at the hinge, I’ll sometimes leave it. The guiding principle for me is minimum intervention: do only as much as is necessary to stabilise the work.
Materials I use and why
I favour materials used by paper conservators because they are reversible, stable and gentle:
Wheat starch paste — made from refined wheat starch powder (e.g. Takeda or conservation suppliers such as Conservation by Design). It’s reversible in water, has good tack and ages compatibly with paper.Conservation tissue — very thin Japanese paper (Tengujo, Usumino, or light-weight kozo tissues) in weights around 6–20 gsm, chosen to match the mechanical properties of the collage substrate.Hake or soft brush — for applying paste; a very soft brush prevents abrasion.Bone folder or Teflon folder — to set edges smoothly without tearing.Blotting paper / Whatman — for controlled drying and removing excess moisture.Glass or acrylic weights — to ensure even, flat adhesion during drying.Humidification setup — a Gore-Tex or controlled humidification chamber for stubborn lifts.Brands aren’t essential but I’ve found pre-refined wheat starch powders from conservation suppliers to be consistent. For tissue, I source Tengujo from Japanese paper specialists; it’s extremely thin, slightly translucent and ideal for near-invisible stabilisation.
Preparing a stable wheat starch paste
My go-to paste ratio for delicate collage work is approximately 1:6 (starch to water, by weight) for a moderately tacky paste. For an even weaker paste (less penetration into fibres) I go up to 1:8. The steps:
Mix the dry starch with a portion of cold water to form a smooth slurry.Bring the remaining water to a simmer and whisk in the slurry, stirring constantly until it thickens to a glossy, translucent gel.Cook for a couple of minutes, then remove from heat and cool slightly.Pass through a fine sieve or muslin to remove lumps.Keep the paste in the fridge for a few days if needed; reheat gently before use.Always make a small batch; fresh paste is easier to control. If you prefer, a pre-made archival paste from a conservation supplier removes variability.
Testing before you touch the original
I never jump straight onto the artwork. First I test:
Adhesion and transparency — try the paste and tissue on a sample of similar paper to see how visible the mend will be.Solubility and discolouration — apply paste to a sample and accelerate ageing if possible (light or heat) to check for yellowing or stain migration.Reaction with media — if the collage has water-sensitive media (gouache, watercolour, charcoal), check whether the paste or moisture will disturb those layers.Tests inform whether I need to use a drier paste, a different tissue, or an alternative approach (for example, edge-lining with Japanese tissue on the reverse rather than on the recto).
Step-by-step consolidation method
Here’s the sequence I use for a typical recto-edge lift where the surface is stable and the media is not water-sensitive:
Clean workspace — lay down clean glass/acrylic or a Teflon sheet to avoid contamination.Humidify if necessary — for very stiff or cockled edges, I gently humidify the entire area in a chamber for a short period to relax fibres. Don’t over-humidify paper with water-sensitive media.Prepare small pieces of conservation tissue cut to size. For visible recto repairs, I cut a slightly tapered shape so the edges blend into the surrounding paper.Thin the wheat starch paste to a wash (roughly cream consistency) for edge consolidation. Thicker paste is used for stronger attachment on the verso.Using a fine hake or brush, apply paste sparingly to the underside of the lifting edge and to the tissue. Avoid flooding the area — too much moisture will cockle the paper.Slip the tissue into place under the edge (for recto repairs, place the tissue on the recto and laid down over the lift). Use a bone folder wrapped in silicone release paper to gently seat and smooth the tissue.Place a piece of silicone release paper or baking parchment on top and lay blotting paper above that. Apply even weight (glass/acrylic panels) and leave to dry slowly, usually overnight.Check adhesion after drying. If the mend is visible on the surface, I feather the edges with a tiny amount of water and a soft brush, or retouch lightly with conservation-grade watercolour to blend tone if necessary.Alternative: backing or edge-lining from the reverse
When the recto has delicate media, or I want an invisible fix, I consolidate from the verso. Cut a slightly larger tissue patch and paste it to the back, overlapping the lift by a few millimetres. This preserves the surface while giving mechanical support.
Drying, flattening and monitoring
Controlled drying is key. Rapid drying can distort paper; slow, even pressure prevents cockling. I usually leave works between blotters under weight for 12–24 hours. Afterwards I monitor for a week, checking that the newly attached edge remains stable as the piece acclimatises to room humidity.
Troubleshooting common problems
If the tissue shows a halo or the paste appears cloudy, the paste may have been too thick or not well cooked; adjust the recipe for the next attempt. If the edge re-lifts, consider a slightly larger patch, a stronger paste (but still reversible) or a tiny amount of methylcellulose in the mix to increase tack. If water-sensitive media is disturbed, stop and consult a paper conservator — surface consolidation with dry methods may be safer.
Final practical tips
Always record your intervention in the object’s conservation notes: materials used, paste strength, tissue type and date.Work incrementally — small patches and repeated checks avoid over-treatment.If in doubt about valuable or historic pieces, consult a trained paper conservator.For transport or framing, add a window mat or spacers so the stabilised edges won’t be compressed against glazing.Consolidating flaking collage edges is a careful balancing act between stability and preservation of appearance. With a modest toolkit, tested paste and thin Japanese tissue, you can achieve discreet, reversible repairs that protect the work without altering its character.